Showing posts with label repaints. Show all posts

Monday, 4 July 2016

Jumpmaster repaints - Finished!

I've started, so I'll finish
Good day to you dear readers! Whilst the nerf bat has in some small way fallen on the Jumpmaster 5000 combo, I was in fact half way through finishing my third repaint. So in the best mastermind tradition I decided I was going to finish what I'd started and get my third Jumpmaster finished. 
 
Here it is, in all its glory! I'm a really big fan of the chequerboard, it gives it a retro feel. It's mostly down with my new bff, masking tape. But the smaller pattern is all free hand. So it's a nice mix of both. It's definately very striking compared to the previous 2 jumpmasters. The effects on the other 2 are much more muted than this. Ironically it's probably the easiest of the 3 (because of the masking tape) and the one that will catch the eye from a distance because of the colour contrast.
 
I highlighted the black as best I could (hopefully it shows up in this photo) as it draws your eye to the squares and tricks it into thinking the paint job is super good. At least, that's the idea!
 
The engines came out well again.  I think I've got this down, which sounds simple but actually isn't because of the 3 different planes on which the engine glow needs to appear the same. The first time I was constantly putting the paint in the wrong place because I couldn't get my forth perception right!
 
The hull is my trademark foam dusted paint effect, which has turned out quite nicely. Pick and pluck foam has been a revelation with these guys. I've used it on all three and it ties in really well. Here they are flying in formation:
 
And again, u-boating off into the distance. 
 
So there we are! If you wanna see how to magnetise like this, go here! Otherwise, tune in soon for more hobby related shenanigans! 

Wednesday, 18 May 2016

Possible double trouble lists

Dear readers! I am slightly undecided on which configuration of howling griffons to take! Having pinned my colours to the mast in terms of using an old model or two, I will of course be taking space marines. Lucky for me, the howling griffons are a succesor chapter of the ultramarines, and in this case for me it has more than one level of significance. As already mentioned, the bad boys in blue represent the first models I ever painted. 
 
As you'll see, there are a couple of different configurations of army in these pictures. Basically, I probably can only afford 1 drop pod, so I'm torn between sternguard and another squad of bikes, or simply grav cannon centurions. The grav centurions and the bikes were both massive players for me at the last 2 Blog wars and I'm thinking that actually they will have proportionally more effect at 750. 
 
There is a way that I can squeeze both in, but it does leave me with not a lot of room for much else. I have to start sacrificing my speed and that is something that this force is reliant on. Lots of bikes, with a librarian on a bike making them all super scoring is sorely tempting, considering the objective nature of the missions. 
 
Another option would be to get rid of the scouts and thunderfire cannon to fit them both in, but again I think that they bring more to the table than a squad of sternguard. If I wanted to go really left field I could run the ultramarines on foot as legion of the damned. That might be quite characterful as well, something about thier unwillingness to die coupled with a 3++ save is quite appealing. 

Anyway, these were all the thoughts rolling round in my head whilst I listened to Man U secure a mighty 5th place last night. I've done some number crunching and most of these different building blocks fit together quite well, it's just the centurions. So over to you! Which unit that I've listed would you least like to see? How speedy do you think my force needs to be? Would you take legion of the damned? I look forwards to hearing your thoughts. 

Monday, 28 March 2016

Luke goes stripping!

Following on from a friends blog on stripping, I thought I'd offer my thoughts. To be clear, in this context stripping means removing paint from old models. It doesn't means removing clothes from young models. 


I decided to liquidate some old models that are just taking up space to fund other parts of my addiction the models in question were half painted or under coated black. I've actually unsuccessfully tried to sell these sister of battle before, but was unsuccessful. I thought I'd try stripping them down back to the metal before re-selling them. 

I'm using nail polish remover that does contain acetone, as I feel it gets a little more of the paint off. Following a tip from topher, I put them in a sealed jar and left them for about 2 weeks, giving the nail polish remover time to work its magic. 


My top tip would be to leave the jar full of liquid whilst you're cleaning down a model. Whilst holding a mode, take a toothbrush and dip it into the remaining fluid and then brush the paint off the model. Having a wet toothbrush dripping in nail polish remover is great for this sort of stripping. For some reason, it makes a massive difference and the paint comes off way eaiser!


These gals are all finished now, and will be sold in the near future. I think the hour that it's taken me to clean them up will drastically increase their value, they just look loads better. I'm really pleased with how they've turned out. Not bad for only my third or fourth time stripping!


Friday, 25 March 2016

Punishing 1 repaint part 1

Good Friday good morning! Or afternoon! Whatever :) I've decided that the next ship I'm gonna repaint is the jumpmaster 5000! I've seen a lot of cool repaints flying around on Facebook and forums and stuff, and I wanted to take my own spin on it. Even if I haven't learnt how to fly it yet!


(This is my dengar taking 7 out of 8 hit points off y-wing in one turn!)

I decided that the best thing to do was to try some concept sketches as to what I thought would work. So I broke into my wife's colouring pens and did a bit of drawing:

Here's the first offering. I'm really taken by the purple, and I've seen a lot of repaints where the crescent is repainted a spot colour (red, blue etc) with the rest of the hull a normal colour. I thought about adding some detail through a stripe or double stripe, and splashing some white in there as well. All the time desperately trying to avoid the cockpit looking phallic. 

I scribbled down some names as well, I was thinking about something to do with purple, or royalty. I think I've probably settled on the "Royal Court Cartel" if I use this a purple colour scheme. I think I would go for more shading along the crescent, and transition of from quite a light purple to a darker purple. 


My other attempt was inspired by reading copious amounts of wookiepedia. The Crimson Nova were one of the most powerful bounty hunter guilds, and specialised in collecting bounties on Jedi. I went through a few ideas here, trying to get the shockwave of a supernova expressed on the crescent of the ship. 


I took a bit of inspiration from this picture for the third design on this page. And I think that's the one I'm going to use! I'm gonna have a white-ish hull and then paint a shockwave onto it. So this jumpmaster will be flown by a crimson nova bounty hunter. For the second one (if I buy a second!) I might go with the royal Court Cartell, but equally I might do something with the colour green. I have a lot of shades of green paint, where as I don't really own any purple! Stay tuned for updates on the first one soon :)

Friday, 4 March 2016

Poe dameron and T-70 X-wing repaints

Dear reader! Today I'm sharing my paintjobs for my T-70 x-wings! For those not in the know, they are the ones used in episode 7: The Force Awakens. They are a slightly updated version of the older models used in the ironical trilogy, and this bears out in the X-wing miniatures game. 

Being a sucker for punishment, I really like painting fantasy flights ore painted models. (Even if I could be working thru my back catalogue of things to do painting wise!)


I own two T-70s and normally paint a duplicate fighter to signify that it's an ace. I've done it with the B-wings, A-wings etc. This time, I couldn't resist the chance to paint up Poe dameron's ride. A lot of people have done the same, in fact id go so far as to say that it's the most common repaint I've seen. 


I went for a reasonably classic look here, lightly drybrushing skavenblught dinge over the black to pick out the raised areas. I then used a couple of base coats of games workshop orange before following it up with blazing orange. And then I highlighted the orange with a mix of white and blazing orange. 


The engines are a breakaway from my normal orange glow (there was already enough orange!), with an ice blue through to white effect taking place in less than 5mms. Doing t quickly whilst the paint wasn't dry meant that it all blended in quite well. I added shiney gloss to the engines and the cockpit. 


For my second T-70 (although it was painted first!) I used my now standard paint scheme. Bleached bone all over, tin bits on the metal bits and then wash the whole thing in nuln oil. Following that, lighten back up with tyrant stone (basically a bone colour) to give a rugged, well loved feel to the hull. 


The red was a mecharite red base coat, the blood red, then inked, then brought back up with blood red. I ended up putting gloss varnish of the little wing markings as well :)


For the engines I used the standard red/orange/yellow/white combo that goes on most of my repaints. I'm really pleased with how this turned out, I feel like I've got painting small base ships down quite well now. Really excited about wave 8 now! Will be doing some repaints and vlogs of those bad boys, so keep an eye out for that!

Monday, 14 December 2015

Darksun Life Vol 9 - K-wing Repaints Part 2

A Vlog!


So, I was supposed to Vlog about the trench run game that we played at our club on Wednesday evening, but I had terrible, terrible man flu. Instead, I have Vlogged about my k-wing that I've been repainting (first part available as a blog here).


Thankfully, ive now got a tripod and that means a steady shot as well as leaving me hands free!


I will be reporting on the trench run in the next few days, as well as hopefully videoing what im imagining will be chaotic scenes at my local cinema on the Star Wars opening night! See you later on this week!

Monday, 7 December 2015

X-Wing Repaints Episode 4 - K-Wing part 1

A short blog today. There has been no Vlog this weekend, that is in part because I trialled something at the club on Wednesday that kind of came off, but I wasn’t amazingly happy with it, so I’m going to be giving it another go at Sabres this week.

So I thought I would show you what’s been on my painting table in the past week, as well as tease what we are doing at the club on this Wednesday. This blog is “K-Wing Repaint Part 1”.

the "before" shot
Its part 1 because there is so much real estate on a K-Wing its like painting 2 B-Wings, or at least that’s what it feels like! I think one of the things that have made it feel like such a long haul is the amount of ordinance on the thing. Of course I want that to look all different. In my head, I’m trying to match it to the cards. So if they look like ion pulse missiles, my vague aim was that they're painted like that.


stage 1
I've started off by giving it two coats of GW bone paint. Reasonably thin, to try and keep the detail and also not show paintbrush marks on what is a very flat model. And my camera did me a "favour" by emphasizing that so that the model almost glows yellow. at this point, id not touched the red from the original paint job.


stage 2 (note the stylish advent candles providing backing light!)
What we see here is the model fully base coated. what this means is that following the ubshabti bone I've inked it with black wash, darkening it down. Once that has dried I've used a bit of foam to stipple and drag more bone paint over the model. This brings it back up to be quite bright, so i give it a second thinned down wash of black to blend it all bakc in.
stage 3
I've also put tin bitz on all the engine and gun parts i could find. This in part just establishes them as "metal" in my brain, but also gives me an idea of how much I've got to work with. In the end, i decided to paint over all the red. It just gives me a bit of flexibility with how i choose to put any freehand on - it doesn't just have to be a red triangle on the wing. I've got bigger plans than that. But you'll have to tune in next week for that.

and finally.......

you got em kid!
I can take no credit for the above image (its from here) but this Wednesday we are playing a multi-board Death Star Trench run mission. The guys from our club have really taken to it (shout out to Robin, Jonathan, Andrew and Tim who've all been flying like aces!) so Ian and I are capping of our inaugural campaign with a themed Death Star trench run. Massive credit to Ian for organizing it with me, especially this week (I've not really done anything!) So that's what I'm intending to Vlog by the weekend - some video from that, as well as thoughts and interviews from the guys!

Tuesday, 24 November 2015

Darksun Life Vol 7 - B-Wing Repaints


So, Another week, another Vlog. Sorry its a bit late! real life got really busy over the weekend!


Anyways, check out the video below:


(sorry its only the link, for some reason it wont upload the embedded video)


As ever, comments, feedback are welcome! Im hoping to guest Vlog Aaron next week on Hobby stuff! And later this week I will be updating the Leicester Sabres X-wing league story with a couple of reports.


Tuesday, 17 November 2015

X-wing repaints series. Episode 2: B-wing repairs


So recently, whilst playing my friend Aaron I broke one of my B-wings! Not just true model, but the peg. Right by the engines. Disaster. Especially because they are one of my favourite ships to fly! But also because I figured it would be a total pain to fix. 

So that was about a month ago. On Sunday evening I thought to myself, "I can fix that, I have the skills to fix that!" So I thought I'd give it a go. 

The snap was right in between the engines, and it wasn't a clean break. There was no way I could just whack a bit of superglue on it, it needed pinning. I don't know if you're aware of the X-wing pegs, but they are thin and comparatively brittle. Putting a drill into this made me nervous, because I'd only get one go with the bit that had snapped off. 

To get my eye in I decided to drill into the back of the b-wing first. This was comparatively easy, the drill went straight in-between the engines. My tip here would be to apply even pressure and work slowly, you don't need to rush it. I probably drilled 0.5 cms at least into the back of it. The key here is to go deep because you aren't going to be able to go deep into the peg. So you need that on the ship. 

Next, I drilled into the back of the peg, where it had snapped. This was more difficult, I had to take it really easy because I didn't want to snap the peg through drilling in the wrong place. I filed down the peg as best I could and then made sure that where I was drilling was the centre of the peg. This was tricky, the drill slipped a couple of times before it went in. 

The advantage with drilling into a peg is that it's clear, so you can see where the drill bit is. Make sure you are careful here, I was mentally telling myself that I only got one shot at this. I find it helpful to trial the paperclip out, see how much it goes in, if it's loose etc. 

What I did next, and the bit I think that has probably made this while exercise work is use green stuff. I put a little bit in each end, before dipping the paperclip in super glue. The green stuff makes the join secure when you out the paperclip in (you have no idea how much I'm trying to avoid innuendos) and the superglue cements the join.  

I having cemented the b-wing end, I assessed how much paperclip I'd need to make the join, and then cemented the other in. 

One of the joys about doing this was that I was able change the angle that the ship is flying at. I'm really pleased with this because I'd always wanted to do that with one of them but I'd never been brave enough! So I'm glad I was forced into it. Now I just need to finish painting it!

Thursday, 5 November 2015

X-wing repaints series - episode 1


One of the things in my long absence from writing on this blog I took up was the X-wing miniatures game. I've mentioned before why I like it so much, and one the major bonuses for many people (myself included) is that the ships are painted. 

However, as part of my heart is as a hobbyist I wanted to try my hand at repaints. In this series I will showcase my repaints of various models. I view this as a long term thing - I'd like to repaint all of my models but so far I'm at about 50%. Part of the reason for repainting them is that I want them to look a little bit like spaceships that get used! I feel like the paint jobs that occur "out of the box" have a way to parade ground feel. 


The first ship I wanted to show you is a b-wing. With a lot of my Rebel ships, I have chosen to paint them with red markings. I like the way that themes then together. Obviously the inspiration is red/rogue squadron, but I know that doesn't fit within the canon. 


I've painted this b-wing broadly following the pre-painted markings, just making sure that I emphasise the pipes/wiring that runs across the wings. The trickest bit was not painting over the  pipes on the wings when painting the red, and vice versa. Although when I say tricky, I don't mean shooting a whomp rat tricky. I have another two of these on the go st the moment, but the my aren't finished yet.


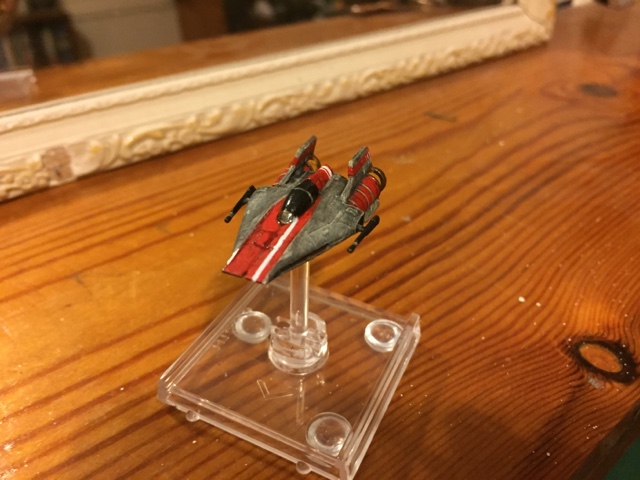
The other offering for the episode if one of my A-wings. The white stipe is to differentiate between ships, and also helps denote the elite pilot, should one be a higher PS than the other.  I'm really pleased with the engines on these guys. They glow a little bit, just like I want them too.


I have most of the rebel ships, and whilst A-wings aren't super competitive they are the most fun ship to fly. They've got a lot of good manevuers available, and the auto thrusters card has really given them another lease of life.

The one thing I'd love advice on is what to strip the paint off with? These guys are painted straight over, and they do begin to loose a bit of their detail. Any suggestions?